Sunday, 16 October 2011

Pork Ribs & Trout

I took my first stab at doing full racks of pork ribs and decided to do a repeat of trout fillets with different rubs and glazes.

I am glad to say that both turned out spectacularly. The trout fillets were brined in soy sauce overnight and then rubbed liberally with dry dill prior to smoking. I also topped it with sliced lemons - be sure to take the peel off the lemons. Otherwise, they will leave a bitter taste wherever they make contact with the fish.


Trout fillets ready to head into the smoker


I smoked the fish at 225F for 2 hours. The first 1.5 hours with cherry smoke and the last 30 minutes without. I glazed it very simply with maple syrup for the last half hour of cooking to give it just a hint of sweetness.


Fillets fresh out of the smoker


The fish was still incredibly moist inside. I tried to get a picture of the juices in the photo below. It turned out a little blurry as someone turned the turn-table just as I snapped the photo.


Very juicy interior
 

I followed my usual procedure for the pork ribs. First and foremost - remove that nasty membrane on the back!!! If you don't do this, you will NEVER get them to fall off the bone as that membrane is like a sheet of rubber and will hold the meat to the bones. Once that is out of there, brine the ribs overnight in a simple salt and sugar solution followed by a smearing of mustard and liberal application of my sugarless pork butt dry rub. I then left the ribs to sit for a second night in the fridge. I pulled them out a few hours prior to smoking to allow them to come up to room temperature.
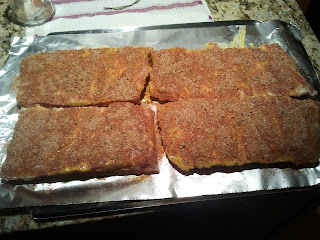

Ribs ready to hit the smoke


The first 2 hours of cooking were done using cherry smoke at 225F. After 1 hour, I basted the ribs with my pork butt dry rub mop. After the second hour of cooking, I basted the ribs again and then foiled them. I also added about a 1/4" of apple juice to each rib foil package. The juice not only helps to keep the ribs moist as them gently steam inside the packets but it adds a little sweetness to the meat. Cook inside the foil for another 2 hours.

Then, open up the foil packages and apply your glaze. I used my Asian 3S finishing glaze and actually did a double coat. I applied the original coat and allowed it to bake in for 30 minutes and then applied a second coat and baked for another 30 minutes. The result was a nice thick crust that was still sticky and tacky when held and munched on.

The ribs were absolutely fantastic. I had my cousin's family over for supper and they were raving about them. The meat was extremely tender but still held on to enough of its structure that it wasn't like eating baby food. There was no need to use a knife on them as the meat just slid right off the bones. They honestly could not have turned out any better.


A paragon of porkiness

Saturday, 15 October 2011

Kalbi / Galbi Ribs

I decided to try a different approach to beef short ribs and picked up a pack that had been cut across the bone in classic kalbi fashion. For those of you who are not familiar with kalbi, it is a staple Korean dish. It is a grilled dish made of beef ribs that have been marinated in a soy sauce based marinade.

I made up the marinade the night before and allowed it to sit in the fridge overnight so that the salt and sugar could fully dissolve. I stayed fairly true to form in terms of the marinade ingredients. Click here for the recipe.


Kalbi marinade


The morning of the grill session, I washed the ribs and placed them into a freezer bag. I then poured the marinade into the bag and worked it around all the ribs. Place the bag back into the fridge and allow it to marinade for 8-12 hours. Try to turn the bag every few hours so all the ribs get a good soaking.


Kalbi happily marinading


Kalbi is traditionally grilled and you can certainly do it that way. I decided to use my smoker to cook them. To be honest, I don't think it makes much of a difference whether they are done on the bbq or in the smoker. Since they are sliced so thin, they cook up pretty fast. I cooked mine at about 275F for roughly 35 minutes. They had just cooked through and were still pretty juicy.

If you are expecting the ribs to be tender, you are going to be disappointed. Kalbi is meant to be a little bit of a workout for your mouth. If you want tender beef short ribs, you will have to cook them low and slow Texas style.

Serve the Kalbi with white rice and veggies on the side. And eat them with your fingers! They taste better that way. :)


A plate full of deliciousness

Kalbi Marinade

Kalbi Marinade

3/4 cup soy sauce
1/2 cup water
1/4 cup sesame oil
1/4 cup rice vinegar
1/3 cup sugar
2 tablespoons sweet chili sauce
2 teaspoons ginger powder
1 tbsp garlic powder
1 tbsp onion powder
1 tsp chili powder


Kalbi marinade

Smoked Chicken Lasagna

I have been a bit behind with my posts but I have finally found a little time to catch up on them. A few weeks ago, I smoked off a couple packs of chicken thighs to use in a smoked chicken lasagna.

In order to speed up the cooking process, I de-boned the chicken thighs. I also removed the skin, as I don't want to use that in the lasagna.

The thighs were tossed in a simple seasoning combination of 1 teaspoon each of salt, freshly ground black pepper, basil and oregano. Drizzle on some oil to help the seasonings adhere better to the chicken. Once that is done, smoke at 225 using your wood of choice for about an hour to an hour and a half. All you are looking for is an internal temperature of 165F.

Since I planned on using the thighs in a lasagna, I did not bother with brining, dry rubs, mops or glazes, etc. that I would have done if serving the chicken on its own. Nevertheless, they came out looking very good - extraordinarily juicy and tender, as you can tell from the juices sitting on the meat. It also picked up some great grill marks on the bottom side.


Chicken things fresh out of the smoker


Great grill marks and succulent juiciness


Since, I didn't have time to use the chicken immediately, I stashed it in the fridge overnight. When I was ready to turn it into lasagna, I cut it up into small pieces. I also put mushrooms and onions in the lasagna. However, for additional flavor, I sauteed these separately and then put the cooked mixture into the lasagna.


Onion and mushroom mixture


The lasagna itself was actually fairly straight forward with the smoked chicken being the most unusual ingredient. The sauce I used was made of equal parts tomato-based spaghetti sauce and alfredo sauce. The result was like a rose sauce. In addition to using the standard ricotta (2 cups), cottage cheese (2 cups), and mozzarella cheese (2 cups), I also used cream cheese (1/2 lb). I think the cream cheese adds a great flavor and texture to the dish.

Construct like you would a normal lasagna. I like having at least 4 layers to mine as it seems more pleasing to the eye to see all the different tiers when you cut into it. When everything has been layered, bake it at 350F for about an hour until the cheese at the top is golden brown and delicious.


Smoked chicken lasagna - the finished product

Saturday, 1 October 2011

Asian 3S Finishing Glaze

Asian 3S Finishing Glaze

1/2 cup sweet chili sauce
2 tbsp apple cider vinegar
1/4 cup ketchup
2 tbsp hoisin sauce
1 tsp chili powder


Basic Beef Rub

Basic Beef Rub

Once again, I am going with a sugarless dry rub in order to avoid over caramelization. The lack of sweetness in the dry rub can be compensated for with either an injection, a brine or a sweet finishing glaze (or all 3 combined).

1 tsp ground black pepper
2 tsp kosher salt
1 tbsp onion powder
2 tsp mustard powder
2 tsp garlic powder
2 tsp chili powder
3 tsp paprika

RIBS RIBS RIBS!!!

The main event this time around was beef ribs. although I did have 3 extra thick pork ribs that I also threw on. The beef ribs were short ribs. These are thick (approx 2"), meaty ribs with plenty of marbling and connective tissues. In other words, perfect for low slow smoking.

Typically, these short ribs are cooked in one of two ways - Chicago style or Texas style. The major difference between the two is the texture. Chicago style only takes the internal temperature of the meat up to 150F, not quite fully cooked. The meat tends to have more of a chew at this point. Texas style, on the other hand, takes the meat all the way up to 180F, at which point all the fat and connective tissues have rendered to result in a much more tender, juicy rib. Cooking time is about double for Texas style as it is for Chicago style. Ultimately, of course, the style is up to the diner. My family prefers fall off the bone ribs, so we went Texas style.

Once again, the ribs were brined and dry rubbed the night prior to smoking and allowed to marinade overnight in the fridge. The 3 smaller ribs at the top of the bottom tray are the pork ribs. The rest are all the beef short ribs. I used my sugarless pork butt dry rub for the pork ribs and a basic beef rub for the short ribs.


Dry rubbed ribs

 
Dry rubbed ribs close up


My smoker finally got a bigger workout than the single rack cookouts it has been getting the past few weeks. With all the ribs loaded in, as well as a couple packs of chicken thighs I wanted to smoke off for future use, it was looking pretty full.


Smoker loaded up


I cooked both the beef and pork ribs at 225F for about 4.5 hours. I chose to use cherry wood again. The techniques I used for the two types of ribs were slightly different though. With the pork ribs, I followed a technique very similar to that of the pork shoulder from last week. I smoked it for 2 hours on the rack and then foiled them and smoked them for another 2 hours. After removing them from the foil, I glazed them and smoked for another half an hour. They came out extremely tender and flavorful. I would definitely classify them as fall off the bone.

The beef ribs were also very tender and juicy. However, I did NOT foil them. I simply smoked them on the rack for 3 hours and then glazed them for the last hour of cooking. I took them out when the internal temperature hit 180F.


Beef ribs ready for glazing


Beef ribs ready for glazing close up


The glaze I used this time was a home concoction that I threw together based on what I had in the pantry. It actually came out tasting really good - sweet and sour with a hint of heat. The chili flakes in it give a very inviting visual to the finished ribs and the vibrant red color darkens up well under the heat to get that sought after mahogany color. I will definitely be using it again in the future. Asian 3S Finishing Glaze sounds like a good name for it! Why 3S you ask? Sweet, Sour and Spicy!!!


The Asian 3S Finishing Glaze!!!


Freshly glazed beef ribs


Just like what you would expect to find at a good bbq restaurant, the ribs came out with a great mahogany color and a wonderful stickiness. Letting the glaze bake in for the last hour allowed to form a really nice crust with the dry rub underneath and also allowed it to lose a lot of its moisture to form a sticky, syrupy coat that you had to lick off your fingers. It was great.


Beef ribs ready to eat


Pork ribs (3 near the front) ready to eat


Of course, I tented the ribs after pulling them from the smoker and I let them rest for about 15 minutes before digging in. As previously discussed, this allowed the juice inside to redistribute and reabsorb into the meat. Don't forget to do this!


Moist and juicy beef short rib